DIY Solar Still

By admin

How To Make Your Own Distilled Water
Make your own distilled water from stream or lake water, salt water, or even brackish, dirty water, using these DIY Solar Still Plans. With just a few basic building materials, a sheet of glass and some sunshine, you can purify your own water at no cost and with minimal effort.
Distilled water is not just for drinking, and it’s always worth keeping a few gallons of it on hand. Clean water free of chemicals and minerals has a number of valuable uses:
• Always refill the lead-acid batteries used for solar energy systems or automobiles with distilled water
• Water delicate plants like orchids with distilled water; minerals and additives like fluoride or chlorine that are present in most tap water can harm plants
• Distilled water mixed with antifreeze is recommended for car radiators, as it’s less corrosive
• Steam irons become clogged with mineral deposits unless you use distilled water
The principle of using the sun’s heat to separate water from dissolved minerals has been understood for millennia, salt ponds being the best example of how this knowledge has been put to use in the past. In salt ponds, seawater is drained into shallow ponds and then baked and purified in the sun until all that remains are crystals of salt. In this case, the pure water that gradually evaporated away was considered a useless byproduct, but as far back as the time of the ancient Greeks it was known that seawater could be made fresh and drinkable by this process.
A solar still works like a salt evaporation pond, except that the water that invisibly evaporates is extracted from the air; the minerals and other impurities are left behind and discarded. As the hot, moisture-laden air rises up to the slanting sheet of relatively cool glass sealed to the box, water condenses out in the form of small droplets that cling to the glass. As these droplets get heavier, they roll down the glass to the collector tube at the bottom and then out to the jug.
The box is built from 3/4 ” BC-grade plywood, painted black on the inside to absorb heat. We used a double layer of plywood on the sides to resist warping and to help insulate the box, with an insulated door at the back and a sheet of glass on top.
Finding a good lining or container to hold the water in the inside of the box as it heats and evaporates can be complicated. The combination of high heat and water containing salt or other contaminents can corrode metals faster than usual and cause plastic containers to break down or offgas, imparting an unpleasant taste to the distilled water. The best liners are glass or stainless steel, although you can also coat the inside of the box with two or three coats of black silicone caulk (look for an F.D.A.-listed type approved for use around food). Spread the caulk around the bottom and sides with a taping knife. After it dries and cures thoroughly, just pour water in—the silicone is impervious to the heat and water.
How to Make a Solar Still
We chose to paint the inside black and use two large glass baking pans to hold the water. Glass baking pans are a safe, inexpensive container for dirty or salty water, and they can easily be removed for cleaning. We used two 10 x 15″ pans, which hold up to 8 quarts of water when full. To increase the capacity of the still, just increase the size of the wooden box and add more pans.
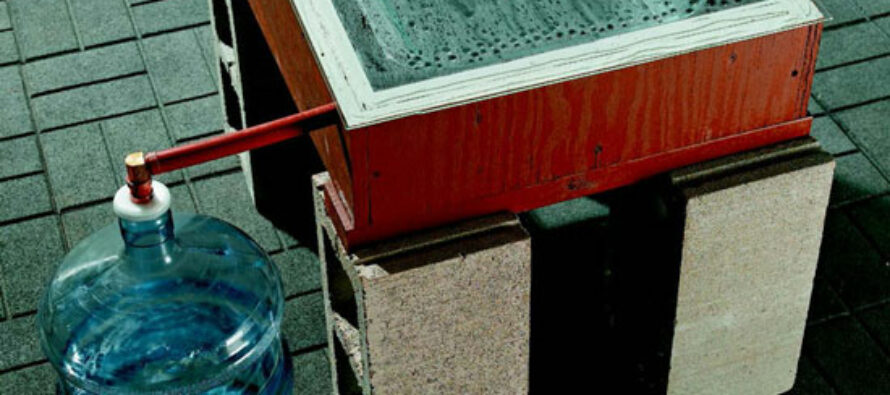
The operation of the distiller is simple. As the temperature inside the box rises, water in the pans heats up and evaporates, rising up to the angled glass, where it slowly runs down to the collector tube and then out to a container.
The runoff tube is made from 1″ PEX tubing. Stainless steel can also be used. However, use caution with other materials—if in doubt, boil a piece of the material in tap water for 10 minutes, then taste the water after it cools to see if it added any flavor. If it did, don’t use it.
Turn undrinkable water into pure, crystal-clear distilled water with a home-built solar still.
View step-by-step photos of how to make a solar still in the Image Gallery as well as this PDF of the DIY Solar Still Plans.
1. Mark and cut the plywood pieces according to the cutting list. Cut the angled end pieces with a circular saw or tablesaw set to a 9 degree angle.
2. Cut the insulation the same size as the plywood base, then screw both to the 2 x 4 supports with 2 1/2″ screws.
3. Screw the first layer of front and side pieces to the base and to each other, then add the back piece. Predrill the screws with a countersink bit.
4. Glue and screw the remaining front and side pieces on, using clamps to hold them together as you predrill and screw. Use 1 1/4″ screws to laminate the pieces together and 2″ screws to join the corners.
5. Glue and screw the hinged door pieces together, aligning the bottom and side edges, then set the door in position and screw on the hinges. Add a pull or knob at the center.
6. Paint the inside of the box with black high-temperature paint. Cover the back and the door with reflective foil glued with contact cement. Let the paint dry for several days so that all the solvents evaporate off.
7. Apply weatherseal around the edges of the hinged door to make the door airtight.
8. Drill a hole for the PEX drain. The top of the PEX is 1/2″ down from the top edge. Clamp a scrap piece to the inside so the drill bit doesn’t splinter the wood when it goes through.
9. Mark the first 19″ of PEX, then cut it in half with a utility knife. Score it lightly at first to establish the cut lines.
10. Drill three 1/8″ holes in the side of the PEX for screws, then insert the PEX through the hole. Butt it tight against the other side, then screw it in place, sloping it about 1/4″.
11. Wipe a thick bead of silicone caulk along the top edge of the PEX to seal it against the plywood.
12. Shim the box level and tack a temporary stop to the top edge to make it easy to place the glass without smearing the caulk. Spread a generous bead of caulk on all the edges, then lay the glass in place. Tape it down around the edges with painter’s tape, then let it set up overnight.
Here’s are some videos showing a few different examples of DIY Solar Stills:
This excerpt has been reprinted with permission from DIY Solar Projects, published by Creative Publishing International, 2011 and originally published on Mother Earth News
Visit: EZ Battery Reconditioning To Learn More here: http://www.survivalistdaily.com/ezbatteryreconditioning
By admin
Write a comment
7 Comments
View comments


Does it work with vegetation inside it in arid environments. You do know about the plastic bag over the branch trick, don’t you?
Plastic bag over the branch works through “transpiration”, that is, the plant leaves “stomata” must open in order to get in the CO2 needed for photosynthesis. Some water is lost through these stomata as water vapor. Still, a solar still can also get some of the moisture out of collected vegetation.
Distilled water is not good for drinking, it can be bad for your health.
distilled water has no minerals, and water in its natural form (properties of water is to have minerals)
so be drinking distilled water it will draw the minerals out of your body and that can be bad for your health.
it is very important to drink mineral water (all bottles of drinking water has minerals )
I had an idea about how to make an almost all metal solar still.
Here is my idea:
Take metal and shape it into a wide and shallow bowl.
Put an insulator on both sides of the metal so that the heat stays inside.
Take some pipe and put it above the bowl.
Take coiled pipe and put it in a metal container filled with cold stuff like ice for example.
Put a spigot at the very end where you have a quart or gallon bucket to collect the water.
This can be built during a sunny day and as long as the weather ranges from it being mostly overcast with sun peaking through the clouds to mostly sunny the sun does its job of heating the water. The bowl there collects rain and if there is a storm it might overflow a little but that gives water to plants and a little bit more water won’t hurt if you have well draining soil so that is a plus. You also might need more buckets on sunny days after a storm.
Make sure you don’t use water with low-evaporation point contaminates, such as alcohol. It will tend to concentrate such contaminates, not remove them.